Generally, the theme tries to match the color name you use in the variant name to a standard color. If this color is not available as the standard color, the color field will be left blank.
Here are the following steps to add custom color swatches to the product page:
1. Create a new Liquid snippet called swatch. liquid
1. From the Shopify admin, go to Online Store > Themes.
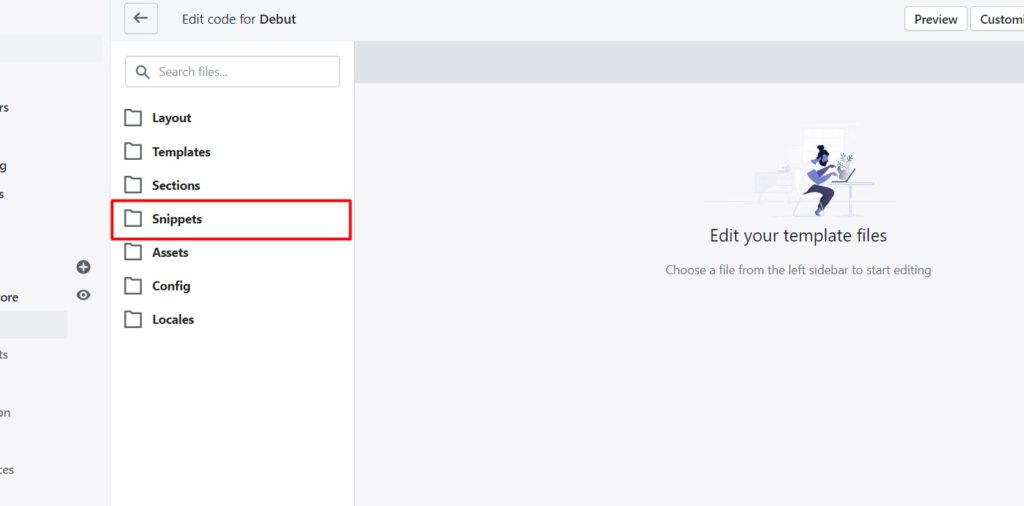
2. Find the theme you want to change, then click Actions > Edit Code. On the left side, click the Snippets section to view the content of the theme’s snippets. Under the Snippets heading, click the Add New Snippet link:
- From the Shopify admin, go to Online Store > Themes.
- Find the theme you want to change, then click Actions > Edit Code.
- On the left side, click the Snippets section to view the content of the theme’s snippets.
- Under the Snippets heading, click the Add New Snippet link:
(Shopify swatches code)
5. Call your new snippet ‘swatch‘. Click Create snippet.
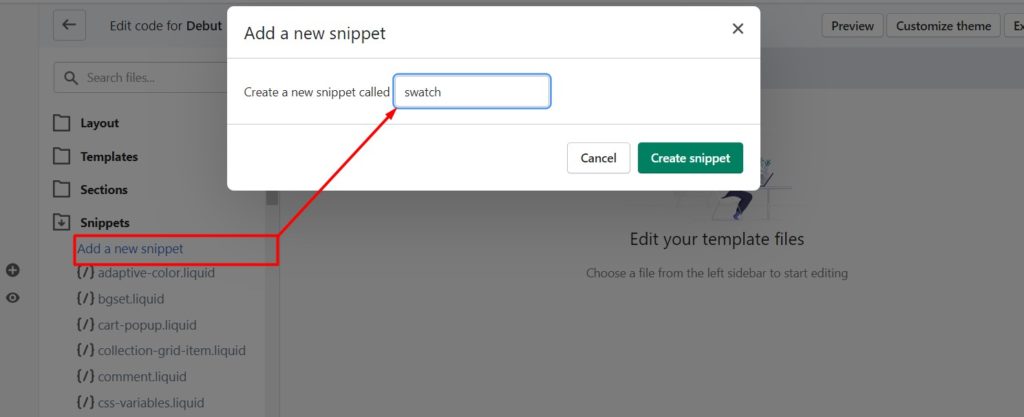
6. Add following code into your new swatch.liquid snippet.
{% assign file_extension = 'png' %}

{% if swatch == blank %}
<div class="swatch error">
  <p>You must include the snippet swatch.liquid with the name of a product option.</p>
  <p>Use: <code>{% raw %}{% include 'swatch' with 'name of your product option here' %}{% endraw %}</code></p>
  <p>Example: <code>{% raw %}{% include 'swatch' with 'Color' %}{% endraw %}</code></p>
</div>
{% else %}

{% assign found_option = false %}
{% assign is_color = false %}
{% assign option_index = 0 %}

{% for option in product.options %}
  {% if option == swatch %}
    {% assign found_option = true %}
    {% assign option_index = forloop.index0 %}
    <style>
      label[for="product-select-option-{{ option_index }}"] { display: none; }
      #product-select-option-{{ option_index }} { display: none; }
      #product-select-option-{{ option_index }} + .custom-style-select-box { display: none !important; }
    </style>
    <script>$(window).load(function() { $('.selector-wrapper:eq({{ option_index }})').hide(); });</script>
    {% assign downcased_option = swatch | downcase %}
    {% if downcased_option contains 'color' or downcased_option contains 'colour' %}
      {% assign is_color = true %}
    {% endif %}
  {% endif %}
{% endfor %}

{% unless found_option %}
<div class="swatch error">
  <p>You included the snippet swatch.liquid with the name of a product option — <code>'{{ swatch }}'</code> — that does not belong to your product.</p>
  <p>Use <code>{% raw %}{% include 'swatch' with 'name of your product option here' %}{% endraw %}</code></p>
  <p>Example: <code>{% raw %}{% include 'swatch' with 'Color' %}{% endraw %}</code></p>
  <p><strong>This is case-sensitive!</strong> Do not put in <code>'color'</code> if your product option name is <code>'Color'</code>.</p>
</div>
{% else %}
<div class="swatch clearfix" data-option-index="{{ option_index }}">
  <div class="header">{{ swatch }}</div>
  {% assign values = '' %}
  {% for variant in product.variants %}
    {% assign value = variant.options[option_index] %}
    {% unless values contains value %}
      {% assign values = values | join: ',' %}
      {% assign values = values | append: ',' | append: value %}
      {% assign values = values | split: ',' %}
      <div data-value="{{ value | escape }}" class="swatch-element {% if is_color %}color {% endif %}{{ value | handle }} {% if variant.available %}available{% else %}soldout{% endif %}">
        {% if is_color %}
        <div class="tooltip">{{ value }}</div>
        {% endif %}
        <input id="swatch-{{ option_index }}-{{ value | handle }}" type="radio" name="option-{{ option_index }}" value="{{ value | escape }}"{% if forloop.first %} checked{% endif %} {% unless variant.available %}disabled{% endunless %} />
        {% if is_color %}
        <label for="swatch-{{ option_index }}-{{ value | handle }}" style="background-color: {{ value | split: ' ' | last | handle }}; background-image: url({{ value | handle | append: '.' | append: file_extension | asset_url }})">
          <img class="crossed-out" src="{{ 'soldout.png' | asset_url }}" />
        </label>
        {% else %}
        <label for="swatch-{{ option_index }}-{{ value | handle }}">
          {{ value }}
          <img class="crossed-out" src="{{ 'soldout.png' | asset_url }}" />
        </label>
        {% endif %}
      </div>
    {% endunless %}
    {% if variant.available %}
    <script>
      jQuery('.swatch[data-option-index="{{ option_index }}"] .{{ value | handle }}').removeClass('soldout').addClass('available').find(':radio').removeAttr('disabled');
    </script>
    {% endif %}
  {% endfor %}
</div>

{% endunless %}

{% endif %}
7. Save your changes.
2. Include swatch.liquid in product.liquid
1. On the Edit, HTML / CSS page, under the Templates, heading on the left, locate and click product.liquid to open the product template in the online code editor.
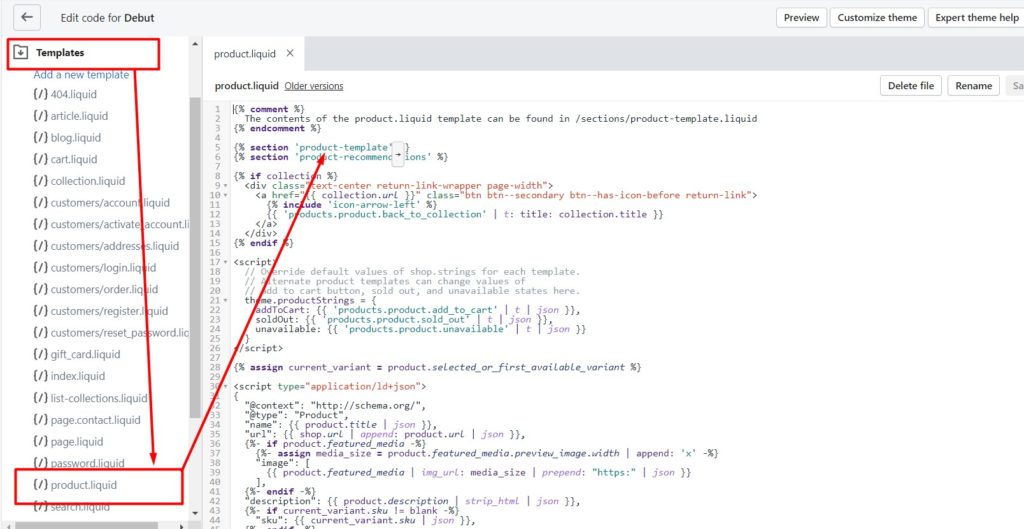
2. Include the swatch.liquid snippet where you want to insert a swatch (Normally it is added below the price and review part or below the product image). Include it with the name of the product option you need to turn into a sample. For example, use this code if your product has a Color option:
{% if product.available and product.variants.size > 1 %}
  {% render 'swatch' with 'Color' as swatch %}
{% endif %}
If you want to use the button treatment on a Size option, use this:
{% if product.available and product.variants.size > 1 %}
{% render 'swatch' with 'Size' as swatch %}
{% endif %}
If you want to apply the button or swatch treatment button to all product options, use this:
{% if product.available and product.variants.size > 1 %}
{% render 'swatch' for product.options as swatch %}
{% endif %}
With this final snippet, color swatch processing is automatically applied to all product options that contain the word color or size, while button processing is applied to all other options.
When you receive a color swatch treatment, your color drop-down menu is removed from the product page which is the default by theme, and replaced with a series of brightly colored buttons. When you get a button treat, your options drop-down menu is removed from the product page and replaced with a series of gray labeled buttons.
If you don’t know which snippet to use, use the latest one.
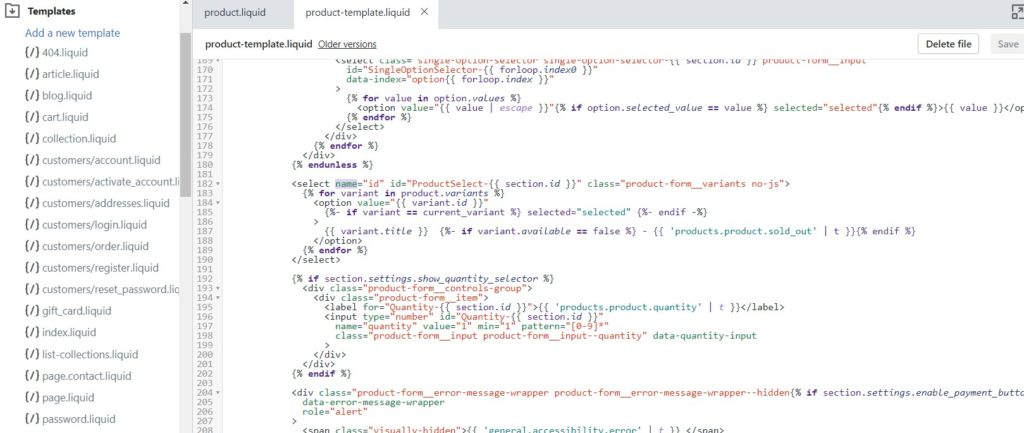
If you’re not sure where to insert your snippet, look for a select element with the name ‘id’ and add your snippet right below that element:
3. Locate your selectCallback function
The selectCallback function in a Shopify theme updates the state of the Add to cart button and the displayed selling and “compare at” prices when a variant is selected.
Still in your product.liquid file, locate this:
selectCallbackDon’t see it? Under the Layouts folder, locate and click the theme.liquid file to open it in the online code editor. In a fair amount of themes, the selectCallback function is located in this file instead of product.liquid.
After you have located your selectCallback function, add the following code to the body of the function, either at the top or bottom:
// BEGIN SWATCHES
if (variant) {
  var form = jQuery('#' + selector.domIdPrefix).closest('form');
  for (var i=0,length=variant.options.length; i<length; i++) {
    var radioButton = form.find('.swatch[data-option-index="' + i + '"] :radio[value="' + variant.options[i] +'"]');
    if (radioButton.size()) {
      radioButton.get(0).checked = true;
    }
  }
}
// END SWATCHES
4. Add code at the bottom of theme.liquid
Still on the Edit HTML/CSS page, under the Layouts heading on the left, locate and click your theme.liquid file to open it in the online code editor.
At the bottom of your theme.liquid file, right above your </body> tag, add this code:
<script>
jQuery(function() {
  jQuery('.swatch :radio').change(function() {
    var optionIndex = jQuery(this).closest('.swatch').attr('data-option-index');
    var optionValue = jQuery(this).val();
    jQuery(this)
      .closest('form')
      .find('.single-option-selector')
      .eq(optionIndex)
      .val(optionValue)
      .trigger('change');
  });
});
</script>
5. Upload a soldout.png graphic to your theme assets
We are going to upload a graphic to our theme assets that will be overlaid on top of our buttons when their associated value is sold out for all variations of our product.
You can use this one image below, save it to your desktop:

The CSS we’re using will stretch or compress that graphic so that it fits nicely onto the button or swatch box.
1. On the Edit HTML/CSS page, locate and click the Assets folder to display its content.
2. Under the Assets heading, click the Add a new asset link.
3. Upload your soldout overlay.
6. Add CSS to your stylesheet
1. On the Edit HTML/CSS page, locate and click the Assets folder to display its content.
2. Under the Assets heading, locate a file with extension .css.liquid that is not checkout.css.liquid. There should be only one other file. Such file is often named styles.css.liquid, style.css.liquid or shop.css.liquid.
3. After you have located your file, click it to open it on the online code editor. Copy and paste this code at the bottom of your file. It is important that you append the CSS at the bottom of your stylesheet.
/*
   Swatches Styles
*/

{% assign width = '50px' %}
{% assign height = '35px' %}
.swatch {
  margin:1em 0;
}
/* Label */
.swatch .header {
  margin: 0.5em 0;
}
/* Hide radio buttons.*/
.swatch input {
  display:none;
}
.swatch label {
  /* Rounded corners */
  -webkit-border-radius:2px;
  -moz-border-radius:2px;
  border-radius:2px;
  /* To give width and height */
  float:left;
  /* Color swatches contain no text so they need to have a width. */
  min-width:{{ width }} !important;
  height:{{ height }} !important;
  /* No extra spacing between them */
  margin:0;
  /* The border when the button is not selected */
  border:#ccc 1px solid;
  /* Background color */
  background-color:#ddd;
  /* Styling text */
  font-size:13px;
  text-align:center;
  line-height:{{ height }};
  white-space:nowrap;
  text-transform:uppercase;
}
.swatch-element label { padding:0 10px; }
.color.swatch-element label { padding:0; }
/* Styling selected swatch */
/* Slightly raised */
.swatch input:checked + label {
  -webkit-box-shadow:0px 1px 2px rgba(0,0,0,0.8);
  -moz-box-shadow:0px 1px 2px rgba(0,0,0,0.8);
  box-shadow:0px 1px 2px rgba(0,0,0,0.8);
  border-color:transparent;
}
.swatch .swatch-element {
  float:left;
  -webkit-transform:translateZ(0); /* webkit flicker fix */
  -webkit-font-smoothing:antialiased; /* webkit text rendering fix */
  /* Spacing between buttons */
  margin:0px 10px 10px 0;
  /* To position the sold out graphic and tooltip */
  position:relative;
}
/* Image with the cross in it */
.crossed-out { position:absolute; width:100%; height:100%; left:0; top:0; }
.swatch .swatch-element .crossed-out { display:none; }
.swatch .swatch-element.soldout .crossed-out { display:block; }
.swatch .swatch-element.soldout label {
  filter: alpha(opacity=60); /* internet explorer */
  -khtml-opacity: 0.6;      /* khtml, old safari */
  -moz-opacity: 0.6;       /* mozilla, netscape */
  opacity: 0.6;           /* fx, safari, opera */
}
/* Tooltips */
.swatch .tooltip {
  text-align:center;
  background:gray;
  color:#fff;
  bottom:100%;
  padding: 10px;
  display:block;
  position:absolute;
  width:100px;
  left:{{ width | remove: 'px' | to_number | divided_by: 2 | minus: 50 | plus: 2 }}px;
  margin-bottom:15px;
  /* Make it invisible by default */
  filter:alpha(opacity=0);
  -khtml-opacity: 0;
  -moz-opacity: 0;
  opacity:0;
  visibility:hidden;
  /* Animations */
  -webkit-transform: translateY(10px);
     -moz-transform: translateY(10px);
      -ms-transform: translateY(10px);
       -o-transform: translateY(10px);
          transform: translateY(10px);
  -webkit-transition: all .25s ease-out;
     -moz-transition: all .25s ease-out;
      -ms-transition: all .25s ease-out;
       -o-transition: all .25s ease-out;
          transition: all .25s ease-out;
  -webkit-box-shadow: 2px 2px 6px rgba(0, 0, 0, 0.28);
     -moz-box-shadow: 2px 2px 6px rgba(0, 0, 0, 0.28);
      -ms-box-shadow: 2px 2px 6px rgba(0, 0, 0, 0.28);
       -o-box-shadow: 2px 2px 6px rgba(0, 0, 0, 0.28);
          box-shadow: 2px 2px 6px rgba(0, 0, 0, 0.28);
  z-index: 10000;
  -moz-box-sizing:border-box;
  -webkit-box-sizing:border-box;
  box-sizing:border-box;
}
.swatch .tooltip:before {
  bottom:-20px;
  content:" ";
  display:block;
  height:20px;
  left:0;
  position:absolute;
  width:100%;
}
/* CSS triangle */
.swatch .tooltip:after {
  border-left:solid transparent 10px;
  border-right:solid transparent 10px;
  border-top:solid gray 10px;
  bottom:-10px;
  content:" ";
  height:0;
  left:50%;
  margin-left:-13px;
  position:absolute;
  width:0;
}
.swatch .swatch-element:hover .tooltip {
  filter:alpha(opacity=100);
  -khtml-opacity:1;
  -moz-opacity:1;
  opacity:1;
  visibility:visible;
  -webkit-transform:translateY(0px);
     -moz-transform:translateY(0px);
      -ms-transform:translateY(0px);
       -o-transform:translateY(0px);
          transform:translateY(0px);
}
.swatch.error {
  background-color:#E8D2D2!important;
  color:#333!important;
  padding:1em;
  border-radius:5px;
}
.swatch.error p {
  margin:0.7em 0;
}
.swatch.error p:first-child {
  margin-top:0;
}
.swatch.error p:last-child {
  margin-bottom:0;
}
.swatch.error code {
  font-family:monospace;
}
If you can’t find your theme’s stylesheet, copy and paste the CSS provided into a style element, and add that style element at the bottom of your product.liquid file.
7. Upload your color images
For the color options you have, you can either let the smartness of the script provide a color for you, or you can upload an image that represents that color.
The way I have gotten my images from my products in my demo shop was to open each product image on my storefront in the “colorbox” (lightbox) and grab around ~ 55 by 40 pixels section of the product image, then save that small screen grab to my desktop, and rename the image.
Note: There’s an important naming convention to respect here! The image must be named after the color option, but be handled, and have a .png extension.
For example:
If you have a color called ‘Déjà Vu Blue’, then name your image deja-vu-blue.png
If your color is ‘Blue/Gray’, then name your image blue-gray.png.
If your color is ‘Black’, then name your image black.png.
1. On the Edit HTML/CSS page, locate and click the Assets folder to reveal its content.
2. Under the Assets heading, click the Add a new asset link.
3. Upload your image.
Repeat steps 2 and 3 until you have uploaded all your images.